Decorating cakes is not only a way to give them a unique look, but also an art that requires both precision and a sense of aesthetics. One striking and popular decorating method is the drip—an elegantly flowing glaze that gives the dessert a distinctive character. How do you prepare the perfect cake drip? Which ingredients work best, and what should you pay attention to in order to achieve a perfectly smooth and impressive finish?
What is a drip cake?
A drip cake is a striking cake decorated with a flowing glaze that creates characteristic, irregular drips down its sides.
This type of decoration not only catches the eye but also adds elegance and a modern look to the dessert. Although it may seem simple, achieving the ideal effect requires proper technique and the right glaze consistency. Thanks to the drip, even a classic cake gains a spectacular character, and its decoration becomes quick and impressive.
Cake drip | Recipe
You don’t need to spend long hours on intricate ornaments to create a stunning cake. The drip is a simple and quick way to give your bake a unique look—just a few minutes are enough to achieve an elegant decoration that will impress your guests. The key to success is the correct consistency of the glaze and its precise application.
Cake drip | Ingredients
- 100 ml UHT 30% cream
- 150 g of chosen chocolate
- ½ teaspoon of edible gelatin
- 40 ml water
Cake drip | Preparation
- Pour the gelatin into a small bowl, cover with water, and set aside to bloom.
- In a small saucepan, heat the cream over low heat until it begins to gently simmer.
- Add the pre-bloomed gelatin to the hot cream and mix thoroughly until completely dissolved.
- Break the chocolate into smaller pieces, add to the cream, and leave for a moment to let the heat help it melt.
- After a few minutes, mix everything thoroughly until smooth and uniform.
- To avoid lumps, strain the glaze through a fine sieve into a clean bowl.
- Set aside to cool to room temperature, then chill for about 15 minutes in the refrigerator, checking the thickness.
The ready glaze should have a silky consistency that flows freely down the sides of the cake, creating the perfect drip effect.
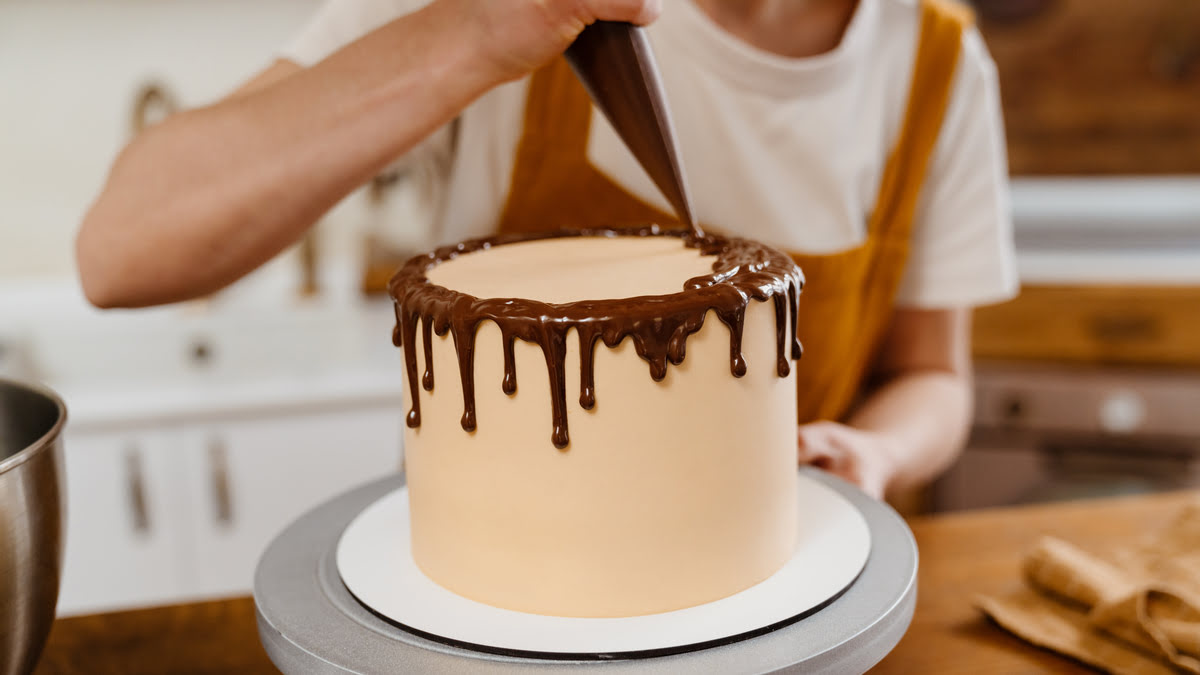
How to apply a drip to a cake?
After removing the glaze from the refrigerator, it’s worth doing a test—apply a small amount to the edge of the cake and check how it runs down the sides. If it spreads too intensely and doesn’t stop at the desired height, chill it again for a few minutes. If the glaze is too thick and doesn’t flow freely, gently warm it in the microwave for 5–10 seconds to achieve the ideal consistency.
Once the glaze reaches the right thickness, you can begin decorating. Apply the drip gradually along the edge of the cake, creating irregular, thinner and thicker streams. After finishing the sides, you can spread the remaining glaze evenly over the top of the cake and gently smooth it out to create an impressive and elegant surface.
What to use to apply a cake drip?
There are several methods of applying a drip, and the choice of technique depends on personal preference and the tools available. It’s worth trying different ways to find the one that delivers the best visual effect. You can start by decorating the edges of the cake and then spread the remaining glaze on top with a pastry spatula. Alternatively, you can first cover the top of the cake and only then let the glaze run down the sides.
Methods of applying the drip
- Piping bag
A piping bag is one of the most precise tools for applying glaze. Simply trim the tip to create a small opening, then control the flow of chocolate, allowing it to run freely down the sides. This technique allows you to easily adjust the length and intensity of the drips, enabling a variety of decorative effects. - Squeeze bottle
Special sauce bottles with a narrow applicator work perfectly for applying a drip. After pouring the glaze into them, you can evenly control its quantity and distribution on the cake. An additional advantage is the ability to store leftover glaze in the refrigerator and reheat it before the next use. - Teaspoon
If you don’t have professional tools on hand, you can use a teaspoon. By taking a small amount of glaze and gently applying it to the edge of the cake, you can achieve a free-flowing drip effect. The key, however, is precise dosing to avoid excessive running down the sides.
Each of these methods yields a slightly different final effect, so it’s worth choosing a technique that suits your decorating style and desired outcome.
Chocolate drip for cake
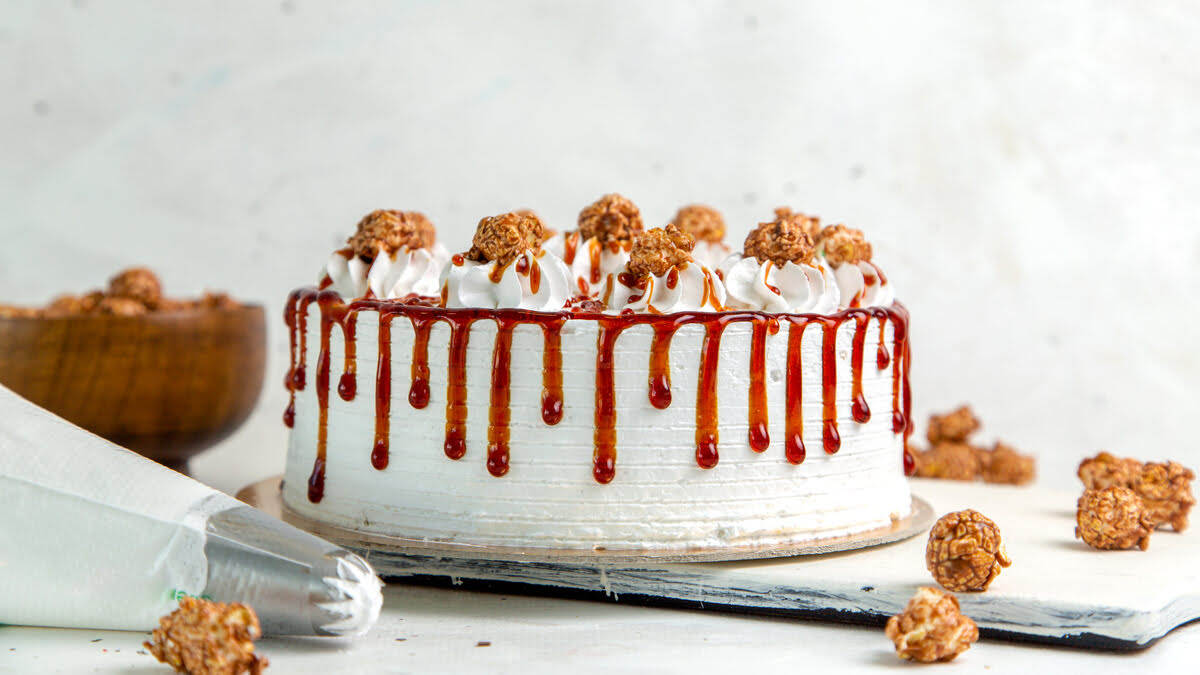
Chocolate glaze looks best on tall cakes with sides at least 10 cm high. This ensures the drips are long enough to create an impressive decoration. The final look of the drip depends on your preferences—you can opt for evenly spaced drips of the same length or create a more dynamic effect by varying their length. An irregular drip gives the cake a natural and slightly more artistic appearance.
When the glaze has slightly set but is still pliable, you can add extra decorative elements. Sugar sprinkles, edible pearls, or gold leaf work perfectly, giving the bake an elegant look. For precise placement of the decorations, you can apply them individually using tweezers or sprinkle them along the sides, allowing them to stick to the slightly tacky chocolate.
Colored drip for cake
To achieve a colored drip, simply tint white chocolate to the chosen shade. It’s crucial to use oil-based colorings designed for chocolate—regular food colorings can cause it to split, leaving unappealing pigment spots.
You can add color in two ways—directly to the warmed cream before adding the chocolate or after it has melted. Regardless of the method, start with a minimal amount of coloring and add more gradually (e.g., using a toothpick) to avoid an overly intense shade.
If you want a pure white glaze, you may need to use a chocolate whitener or white coloring. This is especially useful for creating pastel colors, as it helps achieve delicate, uniform shades.
For a black drip, it’s best to start with dark chocolate. Adding a small amount of oil-based black coloring or black cocoa will give you a deep, intense color without the need for large amounts of pigment.
How to make a gold drip for cake?
A gold glaze is an elegant accent that pairs beautifully with both minimalist and richly decorated cakes. It works wonderfully in glamour, boho, or rustic styles, highlighting the unique character of the bake. It can be combined with decorations such as fresh flowers, fruit, or sweets, giving the whole a luxurious look.
To achieve a gold drip, the best method is to paint the set glaze. First, prepare a classic ganache, apply the drip to the cake, and chill it in the refrigerator until fully set. Then, in a small bowl, mix gold luster dust with a few drops of spirits or alcohol-based extract to create a smooth, uniform paint.
Using a fine brush, carefully apply the coloring to the set drips, aiming for even coverage. The finer the brush, the easier and more precise the application. Once completely dry, the gold drip will gain depth and a beautiful metallic sheen, perfectly complementing the rest of the decoration.
When to apply a drip to a cake?
To achieve aesthetically, evenly flowing drips, the drip should be applied to a well-chilled cake. The best results are obtained with a dessert that has spent at least 30 minutes in the refrigerator—the sufficiently low temperature ensures the glaze stops at the edges and doesn’t run down too quickly.
The temperature of the glaze is equally important. It should be around 30–35°C—too warm may melt the frosting on the cake, causing uneven streaks, while too cool will become thick and difficult to apply. Before applying, it’s worth testing the consistency by doing a trial on a plate, glass, or parchment. Only careful adjustment of the cake and drip temperatures will deliver the perfect decorative effect.
Perfect drip on cake | Tips
To achieve the ideal drip effect, the key is to fine-tune the consistency of the glaze and apply it at the right moment. Even small mistakes can affect the look of the decoration, so it’s worth following a few rules.
- Temperature and thickness of the glaze
The consistency of the chocolate is crucial. A glaze that’s too thin will quickly run down and may become semi-transparent, while one that’s too thick will form chunky, immobile drips. The optimal drip temperature is 30–35°C. - Test before application
Before applying the drip to the cake, do a test on an inverted glass. Pour a small amount of glaze on the rim to see how it flows and whether the desired effect has been achieved. If the consistency is right, you can begin decorating. - The cake must be well chilled
Always apply the drip to a cold cake, straight from the refrigerator. This way the glaze sets faster, doesn’t soak into the frosting, and doesn’t spread too much. - Control the amount of glaze
The length of the drips depends on how much ganache you pour. To achieve short decorative lines, a small amount of glaze is enough. If you want the drips to run closer to the base, apply a little more chocolate in that spot. - The right ratio of cream
If there’s too little cream, the chocolate may become hard after setting and start to crack. To avoid this, use proven ratios. A ganache that’s too thick can be easily corrected by adding 1–2 tablespoons of warm cream and reheating.
Perfecting these details will help you achieve a flawless drip that gives your cake a unique character and a professional look—just like from a patisserie.


